Deploy Express.js On Digital Ocean (Ubuntu) - A Complete, Mostly Succinct Guide
09 May 2015In terms of pricing and configurability, I have not come across any host better than Digital Ocean for Node.js projects. Consider using my referral link to create your Digital Ocean account to earn $10 in credit and support me at the same time.
This is a short tutorial to get started with a very simple, small-scale deployment. While it is a very bare-bones tutorial, it can be (and has been) used for very real deployments. As of this time, I have a couple of production sites running this configuration, namely the LegDay website and Quibbler.
This article is meant to guide you quickly through the steps, not to explain what goes on behind every single command.
At the end of the tutorial, you will have your Node.js app running not on localhost, but on an Ubuntu server, ports listening correctly, domain name set up properly, requests flowing smoothly.
It may look daunting at first glance, but it should be a piece of cake even for beginners, especially if you have managed to write a Node.js web app.
Note: Most of this tutorial should apply to any server running a standard Ubuntu installation. As of this writing, I am running Ubuntu 14.04 on the server, but the same instructions should apply even several years from now. If something does not work, feel free to comment with any questions and I will try my best to answer them.
Prerequisites
For this tutorial, I assume that you are running a Unix-based OS on your local computer. I am running OS X Yosemite. However, anything that can be used for SSH access into the server should work.
Obviously, you need an Express.js app to deploy. The default app generated by express-generator should work, if you just want to try things out. Basically, you need something configured so that when you run npm start in its directory, it starts hosting the app on a local server in your computer.
This guide won’t cover the process of hosting a database on this server. I assume your app manages its database stuff (if any) in whatever way you prefer. In many cases, this means using a database URL and authentication that points to some database hosting service like MongoLab.
Tip: This tutorial works for a Socket.IO powered real-time Express app as well.
You will require a Digital Ocean account. I would appreciate if you used my referral link to create your account. It will get you $10 credit automatically, while supporting me at the same time.
It would be nice to have some experience around the Unix command line, since we will be SSH’ing into the server and using it headless (without a screen) and remotely.
Note: You do not need to travel to where your server is.
The Server
Time to spin up a simple Digital Ocean Droplet (server), running the latest Ubuntu. You may use another distribution of Linux if you wish, but there is no guarantee that all of the following instructions will apply to your system. I highly recommend Ubuntu to keep things simple.

Start by clicking the green Create Droplet button from anywhere on the Digital Ocean dashboard (after you register and log in).
- You can name the Droplet anything you want. I intend to use mine for any future projects, so I went with AntrikshyWeb.
- Select your preferred pricing. The lowest tier is not bad at all. It can handle a small website very well. I’d recommend switching to a higher tier only if you feel like your server is not able to handle the traffic.
- You can select any of the Droplet locations. It’s always a good idea to pick one close to where you expect most of your visitors from.
- Select the latest version of Ubuntu (64-bit) as the OS. As I mentioned earlier, 14.04 is the current version at the time of writing. In the Applications tab, select the latest version of Node.js to be pre-installed. For this simple setup, this is all you need.
- I highly recommend creating an SSH key on your current computer and adding the public key to the server at this time. This is a nice tutorial to follow. Instead of adding the public key to your GitHub account, copy it into Digital Ocean’s form. This way, no root password is generated, and only your computer can access the server via SSH. Of course you can change SSH settings around later.
Then create the Droplet. It should be ready with a fresh Ubuntu and Node.js installation within seconds. You can ask any questions you have at this point in the comments below. Every single one of them will be read.
Digital Ocean Pricing Explained
If you’re wondering how the Digital Ocean hourly and monthly pricing schemes work, it’s pretty simple to understand. They charge you by hour, so you can immediately shut off the server without being charged for the entire month. The monthly fee is a cap for this hourly fee. Once you hit this cap, you are not charged per hour for the rest of the monthly billing cycle.
First-Time Setup
With this fresh Ubuntu installation, you will need to perform a few more steps to get things snugly fit into place and running smoothly.
It is not a very nice idea to run things in production on the root user account. You should create a standard user account for hosting this app (and perhaps all your other web stuff).
Now, connect to your server from your computer using the following Terminal command.
ssh root@IP_ADDRESSReplace IP_ADDRESS with your server’s IP address, which should be provided by Digital Ocean after you create it. Now you are logged in as the root user I mentioned before. Set up a new user account as follows.
adduser yournameReplace yourname with any username, of course. Answer the questions it asks. You can leave a lot of them empty, since this is just a web hosting user and the details won’t be seen by anyone else. You also want to give this user sudo access, meaning the ability to run stuff as root by entering its password whenever needed.
adduser yourname sudoNow that you have a safe, non-root user account ready, you should log into the server using that account. Press Ctrl+D or type logout to end the connection from your local computer. Then log in once again.
ssh yourname@IP_ADDRESSWhen deploying a Node.js app on a production server, it is also a good idea to set the NODE_ENV environment variable to production. Many frameworks (including Express) may self-configure some behavior (like hiding error traces from users) by looking at this environment variable.
Tip: Environment variables are simply some variables that are set globally at the command line and accessible from any program that is run on that computer. Type
printenvto see all currently set environment variables.
To set this variable, edit the .profile file in your home directory.
nano ~/.profileAdd the line export NODE_ENV="production" to the bottom of this file. Press Ctrl+X to save. You can also go ahead and set a variable named PORT to specify which port your app should listen on. You can then read this environment variable in your app’s start script instead of hardcoding it. The default express-generator app does look for this variable and then overrides its default port 3000 if it’s found.
Note: This environment variable step is optional. Skip it and set it up in the Upstart service config file under the Create An Upstart Server section. This way you can enable it for just this app and use this server for testing non-production code in the future while hosting production code at the same time.
Let’s move onto some fun stuff.
Push & Test
It’s time to push the code up to your production server. You can do this in two ways. Since I use GitHub to open source my projects anyway, I prefer the Git method. You can scroll down to the simpler SSH file transfer method if you do not use Git for source control and/or do not have a cloud host that you push your repositories to.
Transfer Via Git
Simply push your project’s Git repo to your cloud service (GitHub, BitBucket or whatever your company/institution uses) using git push origin as usual. Then log into your Droplet and clone the repo.
ssh yourname@IP_ADDRESS

git clone CLONE_URL

cd projectname
Replace CLONE_URL above with the clone URL provided by your Git server. GitHub has a URL in the sidebar of your project’s page.
Transfer Via Manual File Transfer
To manually upload your files directly from your local computer over SSH, follow these instructions.
Log out of SSH and cd to the parent directory containing your main Node.js app folder (the folder above the one containing package.json) on your local computer.
scp ./projectname yourname@IP_ADDRESS:~You will be prompted for yourname’s password and the entire project folder to yourname’s home directory.
Testing The Server
Just as a sanity check, run your Express app just like you did on your local computer while developing it and see if it is accessible from your computer over the web.
cd projectname

npm install

npm start
If the app seems to start up in the same way as it does locally, open up a web browser on your local computer and visit IP_ADDRESS:3000 directly. Replace IP_ADDRESS with your Droplet’s IP and 3000 with any custom port you may have defined (Express defaults to 3000). If something does not work, fix it. I can’t see why it would give you any issues at this stage, but it’s totally dependent on your app.
At this point, your web app should show up in the web browser at this address. Once you have verified this, you can close the server using Ctrl+C as usual.
Create An Upstart Service
Now that we know our Express app runs on this server, it is a nice idea to set it up as an Ubuntu service. This ensures that the app is always running. It makes sure that it starts as soon as the server boots up. This way, in the unlikely event that Digital Ocean goes offline, your website will come right back up as soon as the server boots back up.
Upstart is a utility that comes bundled with Ubuntu and some other distros, which helps you set up services like this.
To set it up as a service using Upstart, create a new file in the /etc/init folder, named websitename.conf, where you replace websitename with whatever name you want. You will use this name when starting, stopping and restarting your website using commands like restart websitename.
nano /etc/init/websitename.confThe line above will open the Nano text editor and will save the file with that name in /etc/init when you press Ctrl+X. In it, paste the following.
Before saving, change the following things.
- The
descriptionline. /home/username/folderto the location of your app. If you cloned it into your home folder, changeusernameto your username andfolderto the name of your repo.PORTvalue if you changed it from3000to something else in your app.bin/wwwif your start script is different. You can also donpm startinstead.
This script is executed when the server boots. It switches to the app directory and executes the bin/www script (or npm start).
The env variables set temporary environment variables. Instead of being visible to the entire system, it only applies to your app. This is an alternative to setting your environment variables globally in the ~/.profile file.
You can reboot your server and check to see if your website starts on IP_ADDRESS:3000 on its own.
You can use the following commands to start, stop and restart your server at any time.
sudo start websitename
sudo stop websitename
sudo restart websitename
Configure Ports With nginx
Now you need to set up a reverse proxy to point the incoming public traffic from the standard port 80 to your app’s port. I’ll assume that is 3000 for simplicity’s sake. This will ensure that users don’t have to navigate to example.com:3000 instead of just example.com to get to your website. We shall use nginx for this. Install it now.
sudo apt-get install nginxIt should automatically start when installed. You should be able to visit IP_ADDRESS, (where IP_ADDRESS is your server’s IP) in a web browser and see an nginx welcome page. If it does now, try running sudo service nginx start.
Use the following nginx config file as a guide. I use it for Quibbler, a Socket.IO project of mine.
Change any instances of “quibbler” to your app’s name. Configure your domain names on the server_name line. The URL won’t work just yet, unless you have configured Digital Ocean already (covered in the next section).
Save the file to /etc/nginx/conf.d, then reload the configuration file in nginx.
sudo service nginx reloadTry running your app once again using npm start. Then type your server’s IP address into a web browser to see if it works without entering the :3000 at the end. If it works, everything has been configured correctly and you are ready to set up your domain name.
Set Up Domain
The final step (although not necessarily) is setting up a nice, public URL to your website. After all, you don’t want to make your users type in your IP address in order to visit your website.
First of all, you need to buy a domain name. I recommend Namecheap. They are a plain and simple domain registrar with great pricing. Consider using my referral link.
After you have purchased a domain name, you will need to log into your registrar’s dashboard and set nameservers for your domain name. Check their documentation or this Digital Ocean article for help on how to do this. On Namecheap, just click the domain name in your registered domain names list and look in the left sidebar. Set three nameservers:
- ns1.digitalocean.com
- ns2.digitalocean.com
- ns3.digitalocean.com
Now you can pick right up in Digital Ocean’s dashboard. Go to the DNS tab and use their Add a Domain form. Enter your URL into the right form field and select your web Droplet from the dropdown menu. It should fill out the IP Address field automatically.
When you hit Create Domain, you will be taken to a form where you can configure your DNS settings. Create the following records.
- An
Arecord with@for the Name field and your server’s IP for the other. - (Optionally) A
CNAMErecord with*(to route every subdomain) orwwwin the Name field andquibbler.co.(with the dot at the end) in the Hostname field.
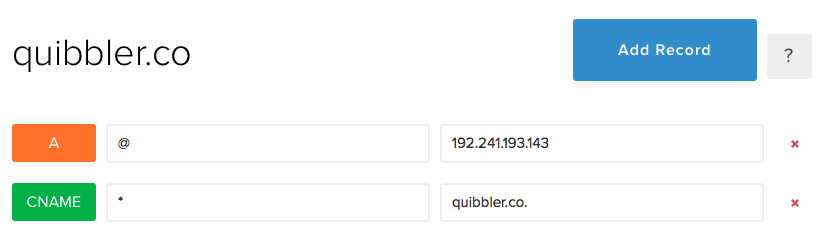
The second record will redirect all requests from www.example.com to example.com. If you use the asterisk, it will route any subdomain to your main website. It’s mostly a style thing and totally up to you. I prefer to keep most domain names clean in the address bar for most addresses.
Your website should soon be available to the public on your example.com domain.
Note: This stuff takes a while to propagate around the world sometimes and sometimes may take up to a day to apply. Just keep checking every few minutes or hours to see if your website is up.
Further Steps
Now that your server is set up, you can make updates to your website by pushing and pulling to and from GitHub or by transferring your files just like I outlined above. Then use sudo restart websitename to update the website with new code.
You can also set up SSH keys on your server so that you don’t need to enter your password when logging in from your local computer.
- Follow the GitHub instructions to make SSH keys on your local computer.
- Copy the contents of the
id_rsa.pubfile from your local computer. - Create a
~/.ssh/authorized_keysfile on the server. - Paste the contents of your local computer’s public key into it (you can keep appending any other computers’ keys on new lines in this file) and save.
You should be able to log into your server without entering a password.
Tip: Now that you have your domain name pointing to your server, you can even log in using
ssh yourname@example.cominstead of your server’s IP address.
If you liked this post, consider using my Digital Ocean referral link to create your new account, to support me, and to get $10 in free credit. But if you’re a student, you can get a better deal if you start out with GitHub’s Student Developer Pack.