Powering On My Desktop PC Using Alexa And A Raspberry Pi
04 Mar 2018A few years ago, before living in a smart home, I used to dream of turning on my gaming PC with a Hollywood-sci-fi voice command like “battlestation up”. A few days ago, I finally achieved it with a bit of elbow grease (and a clunkier voice command).

Proof Of Concept
A few months ago, I was looking for uses for my Raspberry Pi. I started off by seeding torrents for open source projects and running an IPFS node.
Now that I had my Pi running 24/7, I figured I could use it to add a bit of convenience to my everyday routine. I installed Awake, a simple utility to send Wake-on-LAN magic packets to power on computers that support it. Luckily, the Gigabyte motherboard in my gaming PC was capable of accepting Wake-on-LAN requests. You can read up on the Wake-on-LAN standard here. It’s a surprisingly simple spec.
I set up a quick alias on my laptop to send an Awake command over SSH to my Raspberry Pi, which in turn would power on this gaming rig.
Now I knew that my Pi had the capability to power on my desktop, which got me one step closer to the voice control dream.
Stumbling Blocks
At first, this scenario looks like a 2-step process.
- Alexa tells Raspberry Pi to turn on desktop PC.
- Raspberry Pi tells desktop PC to turn on (done!).
However, it’s not that simple. There are a couple of limitations.
- Alexa skills run in the cloud. Because of Amazon’s security precautions, it’s much easier to implement a skill as an AWS Lambda function. The other option is to run it on a self-hosted server, but that requires SSL setup. Running HTTP requests from Echo devices over a local network is not an option. While I would like that to be possible, Alexa seems to have a closer relationship with an Amazon account than the devices it runs on.
- Even if I were to implement the skill using the Raspberry Pi as the self-hosted server, I’d have to get around the fact that it is connected to my home Internet connection and not deployed in a server farm with a static IP address. I have made my Raspberry Pi accessible over the web before. It’s not the easiest thing to set up, and feels a bit sketchy, security-wise.
So the main limitation ends up being the interaction between the Alexa skill (in the cloud), and my Raspberry Pi (in my home). Enter Simple Queue Service from AWS!
The Elaborate Plan
I use SQS heavily at work (at Amazon!), and I absolutely love using it as glue between systems in lieu of traditional HTTP calls; it leaves breathing room in case of bursty data flows by allowing requests to pile up in the “pipeline”.
Conveniently, a typical usage pattern of SQS is having a receiving party query an SQS endpoint in a forever-loop. In this case, the receiving end is my Raspberry Pi, which is perfectly capable of making regular old HTTP requests over my regular old home Internet connection. It’s certainly easier than opening it to the entire web and having it wait for requests to come to it.
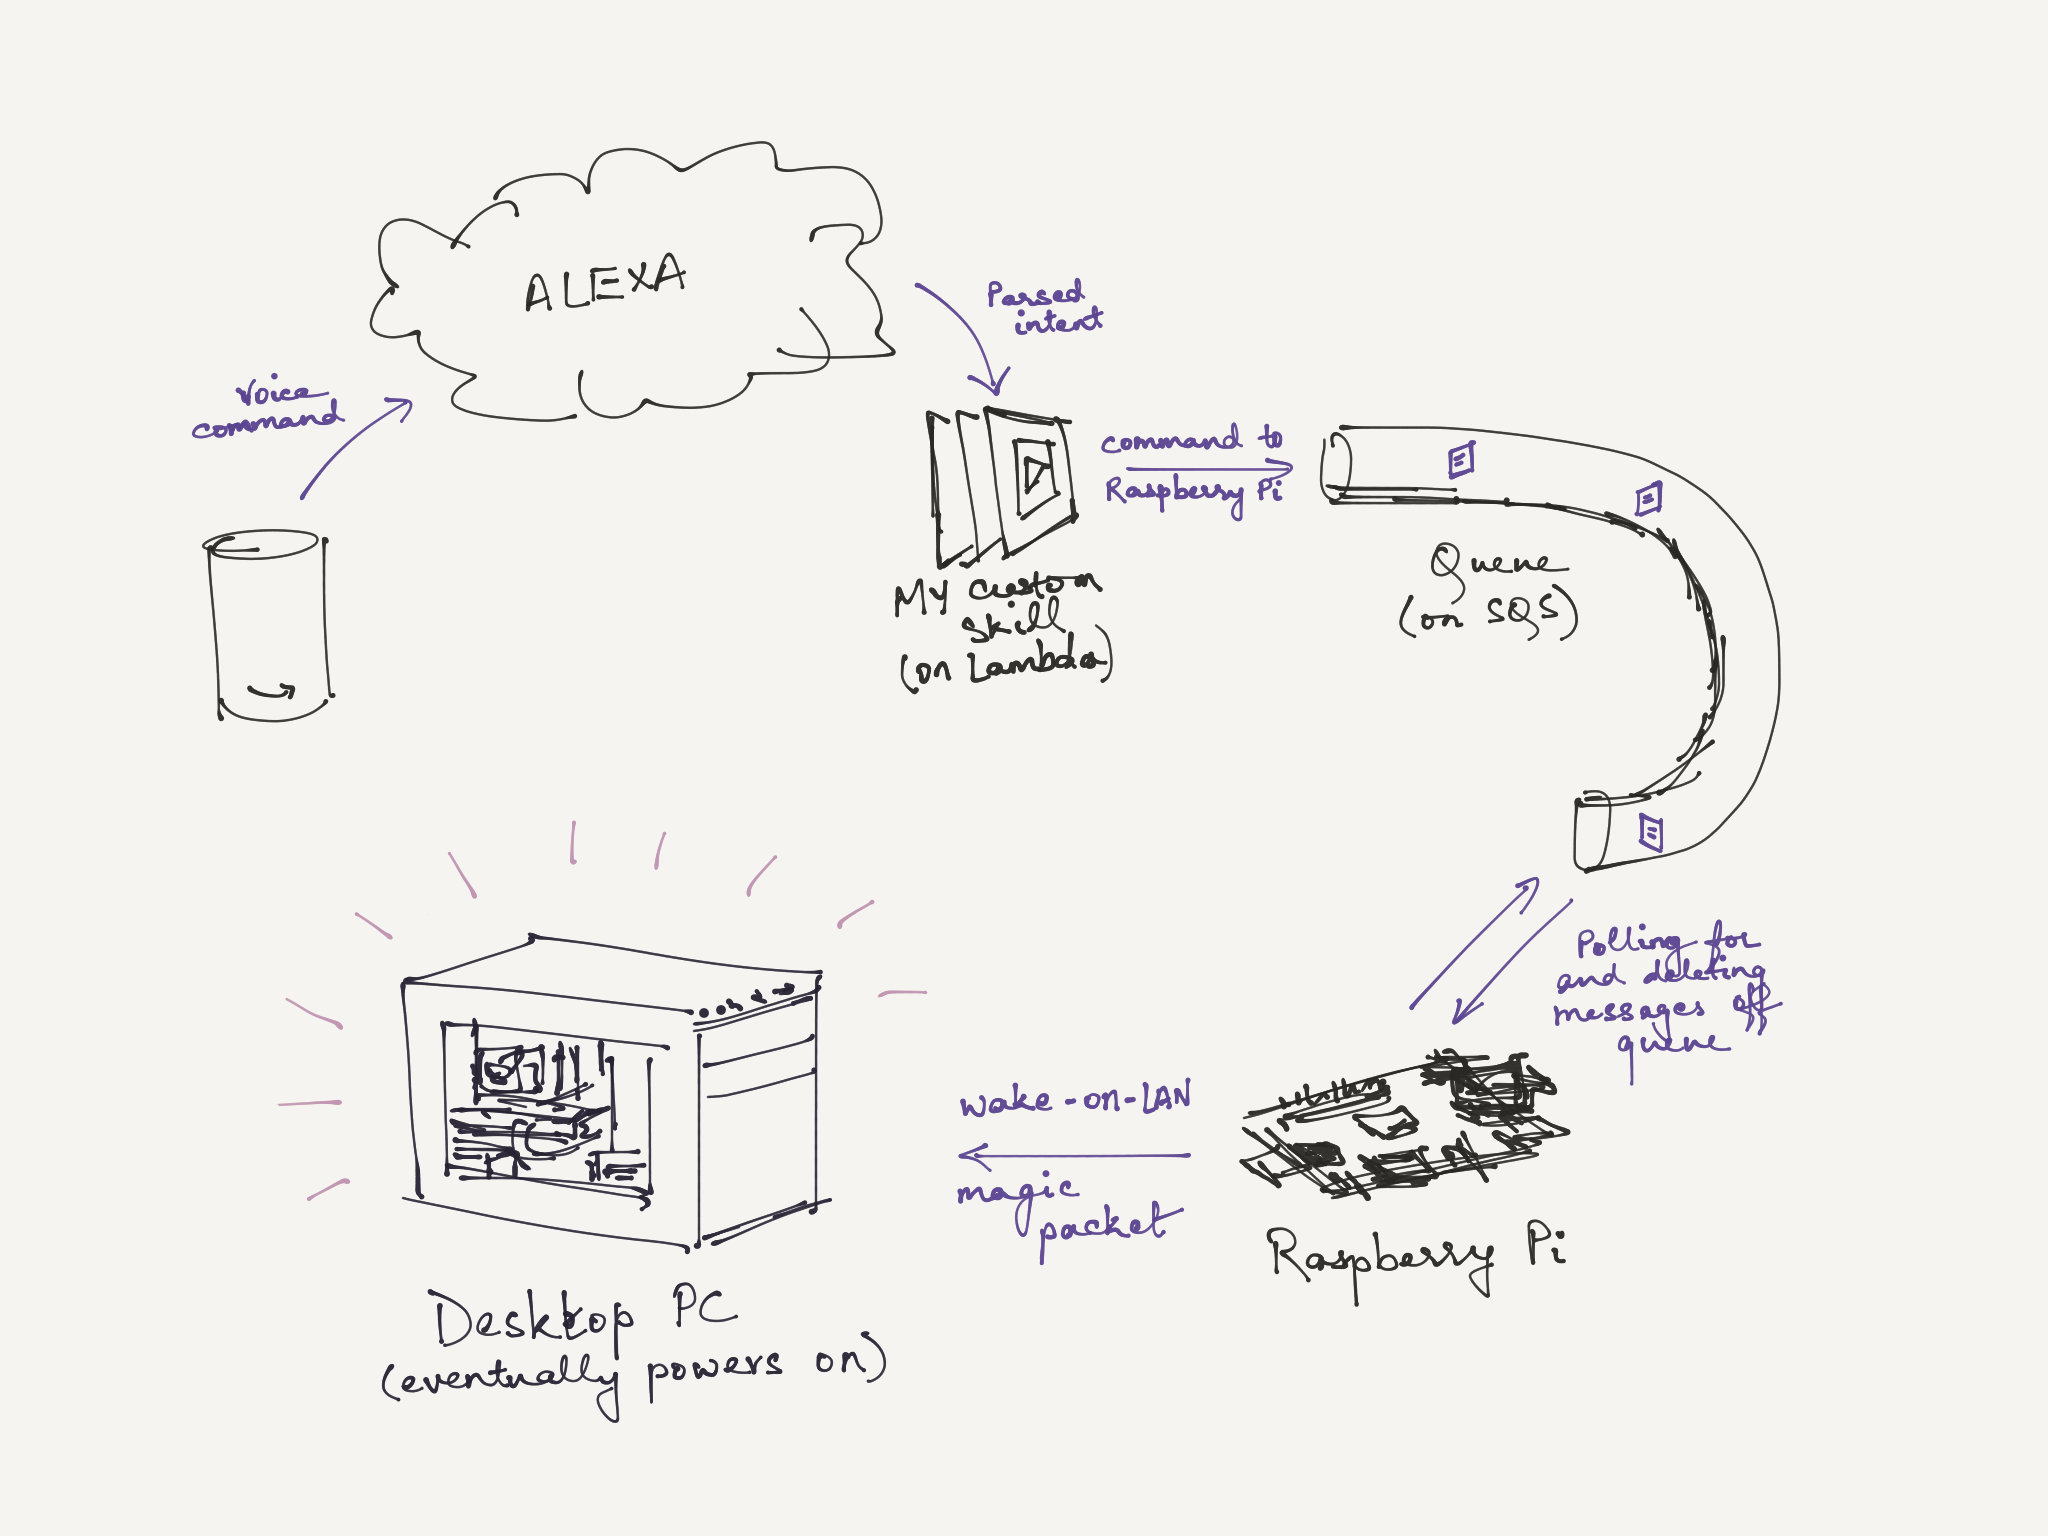
Here is the (over-engineered?) solution I had in mind. My intention was to re-use this SQS queue for other smart home utility-type projects in the future.
Wiring It Up
SQS To Raspberry Pi
I decided to build my SQS integration first to ensure that it is indeed possible for my Pi to comfortably read a queue and parse messages before delving into the various moving parts required to get an Alexa skill working.
I picked Python because it’s what I have been using at work lately and didn’t want to muck around learning something new. The code can be found in its entirety in a GitHub repo linked at the bottom of the post. What follows is a deconstructed and simplified overview.
while True:
    response = # Receive SQS messages
    to_del = []
    for message in response['Messages']:
        body = json.loads(message['Body'])
        if body['intent'] == 'TurnOnPC':
            # Turn on PC
        to_del.append(...) # Queue messages for deletion
    if to_del:
        # Delete consumed messages from the queue to avoid consuming them in a loop (that's how SQS is used)
        sqs.delete_message_batch(...)
The while True at the top of this snippet is my crude runtime loop. In each iteration, it:
- Reads any piled up SQS messages
- Parses each message
- Deletes parsed messages
As each message is parsed, I currently only check whether it’s a request to turn my desktop on. In the future, I could reuse the message format to specify other intents to my Raspberry Pi.
I use Boto3 as my AWS library. The real code (linked at the bottom) also configures Boto’s SQS parser to employ long-polling to reduce costs; in my case, my SQS usage should be free.
How do we send a Wake-on-LAN message, you ask? Conveniently, the Awake tool from earlier can also be imported as a Python library.
from awake import wol

...

for message in response['Messages']:
    if body['intent'] == 'TurnOnPC':
        wol.send_magic_packet(os.environ['DESKTOP_MAC_ADDR'])
After testing the code in an interactive Python shell on the Raspberry Pi (janky, I know), I transferred it into a projects directory I maintain and configured it to run as a service using systemd. This way, it should run in the background and come back up after reboots. The process to do that is a can of worms I’d rather not open in this post. I have included a redacted sample of the configuration I used on GitHub as well.
Alexa To Lambda To SQS
Now that the SQS integration was set up and verified to be working, it was time to get Alexa placing messages on the queue.
I was able to fit the whole thing into one file with the following bare-bones structure.
# Conveniently, Lambda comes with Boto3
import json, boto3

def generate_sqs_message():
    message = {
        # Hard-coded message (JSON)
    }

    return json.dumps(message)

def generate_alexa_response(response):
    return {
        # Alexa response format
    }

def handle_request(event, context):
    sqs = boto3.resource('sqs')
    q = sqs.get_queue_by_name(...)

    if event['request']['intent'] == 'TurnOnPC':
        message = generate_sqs_message()
        q.send_message(MessageBody=message)
        return generate_alexa_response('Battlestation going up!')
This is an abridged form of the whole thing, of course. The full code is linked at the bottom of this post.
Cost
AWS usage fees for this entire project, end-to-end, should be $0. This is because:
- I used SQS long-polling, effectively staying under the monthly free usage limit. Alternately, a regular poll every 3 seconds results in request counts just under the monthly free usage limit at the time of this writing.
- Lambda is legitimately easy to use for free in a pet project. It has a very simple billing system and comes with a high number of free executions every month.
All I pay for is the minuscule amount of electricity that my Raspberry Pi, my desktop PC (while waiting for magic packets), and my Echos use - all things that would be powered regardless!
The Repo
I have created a GitHub repo with all the code involved along with some documentation. If you’re reading this years from now, first of all, I hope you have hoverboards, and second, the repo may have grown to include other everyday utility type stuff using the same infrastructure I described here.
Find the GitHub repo here: Antrikshy/Assisted-Living
Update (mid-2021): The project has, in fact, grown a bit. This follow up post describes another slice of functionality - how I use this stack to open apps on the Windows PC.